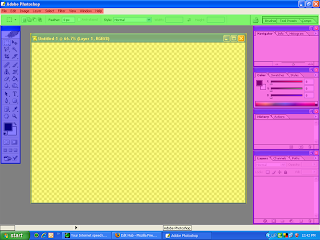
The Menu Bar:
Represented by the color red in the reference image, it is where the menus for performing tasks are located, they are arranged according to what they do for example the Images menu contain tasks that control the settings of the image such as Color Adjustments and trimming and cropping.
The Options Bar:
Represented by the color green in the reference image, it is where the options available are displayed depending on the tool selected like in figure 1.1 the rectangular marquee tool is selected so the options displayed are related to how the tool will be used to select stuff in the image you are working on.
The Palettes Area:
Represented by the color purple, It is where palettes are located they provide tools to modify and monitor images. More on this later.
The Toolbox:
Represented by the color blue, The Toolbox contains the tools for creating and editing images. More on this later.
The Active Image Area:
Represented by the color yellow, The active image area is where you make stuff happen this is where your image will appear. This is where it all matters. The active image area will give you an overview of your work.
Take a closer look...
The Toolbox:
Take a close look at the highlighted tool. It is the rectangular marquee tool and you might notice that there is a little black mark on the lower right of the tool this means there are other tools available that is related to that tool. To access the other tools you just need to Right-Click the tool and the you may select from the available tools. You will find out that when you right click the Rectangular marquee tool you will see The Elliptical Marquee tool, Single Row and Column Marquee tool.
On to the Meat
The Marquee tools are used for selecting parts of your image.
The Move tool as the name implie, moves tools that are currently selected
The Lasso tools much like the marquee tools, are also used to select parts of your image but in a different way and the lasso tools require more precise movements.
The Magic Wand tool is also used to select but it can only select parts of your image that has the same color.
The Crop tool pretty much self explanatory, this tool crops images this means that when you use it the part of the image that is cropped will be the only part of the image that will remain the other parts will be deleted.
The Slice tool, it is used to slice and separate an image into different parts.
The Healing Brush tool, it is commonly used to "Heal" parts of an image it can be used to remove blemishes and tattoos. You first need to define a source point with the alt key. Source points are used to determine what the healing brush will change in your image.
The Patch tool is used to patch up images by defining a place you want to patch then selecting where the patch will come from.
The Brush tool, It is used to apply brush strokes to your image.
The Clone Stamp tool is a lot like the Healing brush. It takes a sample of a part of an image then applies it to the part you select again you will need to define a source point with the alt key.
The History Brush tool is used to restore parts of an image into its previous state.
Eraser tool, It erases parts of an image
Magic Erase tool, It erases parts of an image with same color in an instant
Paint Bucket tool, It is used to fill part of an image with a single color
Gradient tool, It is used to apply a gradient to part of an image
Blur, Sharpen and Smudge tools, These are used to manipulate the image according to what the name implies.
Dodge and Burn tools, These are used to lighten or darken parts of an image
Path Selection and Direct Selection tools, These are used with paths produced by the pen tool or the shape tool.
Text tool, It is used to add text to an image
Pen tool, It is used to draw precise paths
Shape tool, It is used to put create figures from pre-defined shapes
Eye dropper tool, It is used to select colors.
Hand tool, It is used to move across a zoomed image
Zoom tool, It is used to zoom in or out of an image


No comments:
Post a Comment